Poll Everywhere was built to make active learning and formative assessment quick and smooth. To that end, let’s run through some strategies for success. We’ll go over common pitfalls to avoid, and give you time-saving tools you can use to keep your focus on what matters.
Act now to prevent end-of-semester grading trouble
(Paid features: Grading & Registration) This is the situation we want to avoid: You try to run a Gradebook report at the end of the semester, and realize half your students are listed as “Unregistered.” Let’s make sure everyone gets due credit. Here’s how:
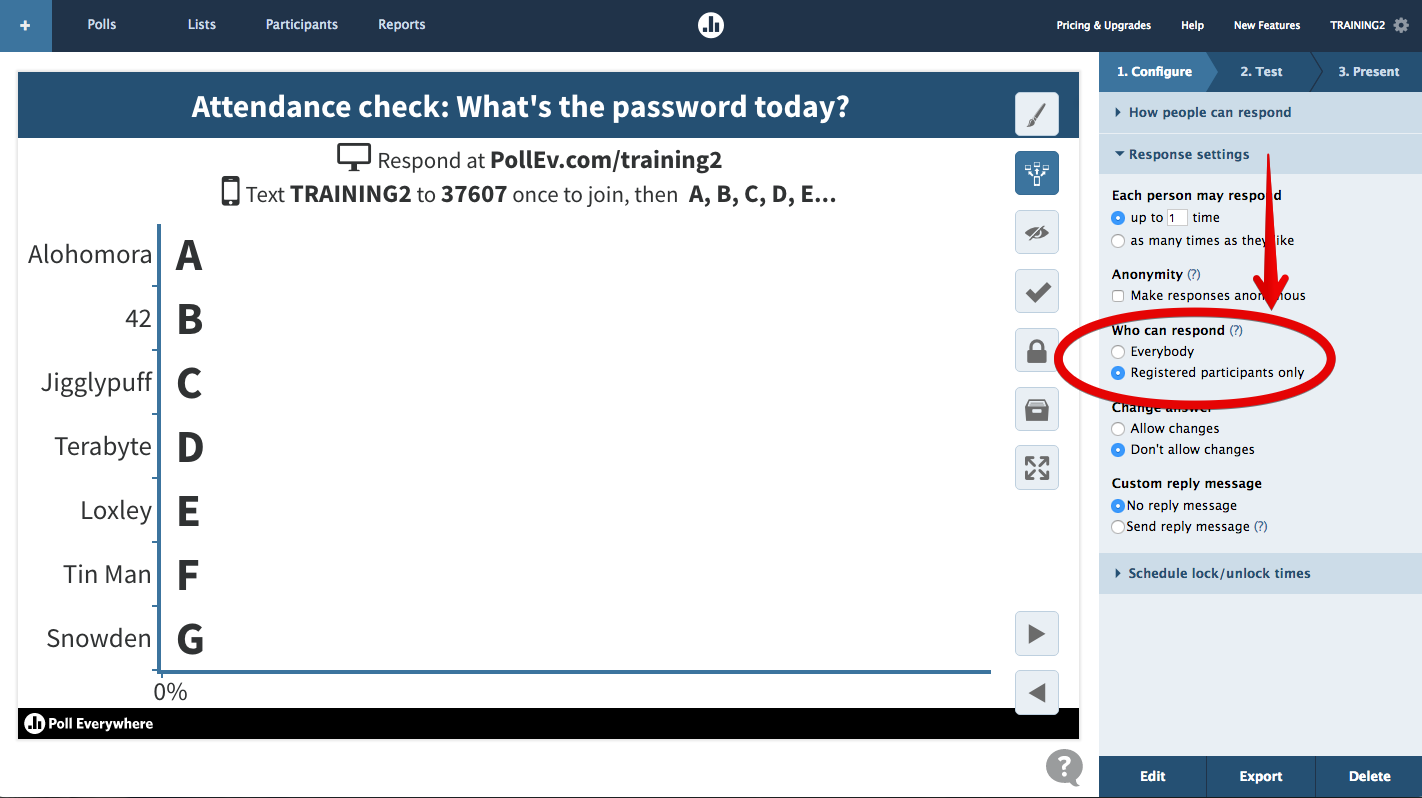
- Remember: You MUST require registration on each of your polls, if you want to grade students’ responses. Choose this setting under Response settings–Registered participants only for one poll, then set that poll as your Account Poll Template. That way it will apply to all future polls.
- Register students by importing a list from your LMS (contact Sales for a new LMS connection), or…
- Add your PollEv registration link to the course website or syllabus. You can also email the link to students.
For step-by-step registration directions, see the Educators’ Guide or the Registration video.
Turn PowerPoint slides (even Turning Point slides) into Activity Slides
(Free) Note: Poll Everywhere works with almost every version of PowerPoint, plus Google Slides and Keynote. However, this particular feature only works on Windows PowerPoint.
- Create a slide with the Title/Content slide template.
- Place the question in the title bar, and the answer choices (if any) in the content box. Separate them with line breaks. Bullets work too.
- Open Poll Everywhere for PowerPoint, sign in, and click Convert to poll.
Now it’s a Poll Everywhere Activity Slide. If it has answer options, it’s a multiple choice poll. If not, it’s an open-ended question. You can edit it right away, or present it fullscreen to your students. The original slide is automatically hidden, and will not appear when you present.
For Turning Point slides it’s even easier, simply click the Convert to poll button, like before.
Tips for using lecture hall computers
Install everywhere: Remember that the Poll Everywhere for PowerPoint add-in must be installed on each computer where you plan to use PowerPoint polling, and you must log in through the add-in each time you use it. (If you plan to simply present polls from the website, this isn’t necessary.)
Next-step installation: If you run into trouble installing the PowerPoint add-in on school equipment, try the enterprise installation instructions, located at the bottom of the Poll Everywhere for PowerPoint page. Your IT team may be able to help also.
Google Slides plugin: You also have the option of running polls in Google Slides with the Poll Everywhere Chrome extension. Often it’s easier to get permission to install a browser plugin if your institution is wary of downloading PowerPoint add-ins. And because Google Slides holds all your slides and polls on the web, there’s less risk of running into operating system conflicts like this next one…
Mac and PC pairings: If the lecture hall computers are PCs, but your personal prep computer is a Mac, be sure to test a few of your Poll Slides on the PC before presenting them in class. Some versions of Mac PowerPoint and Windows PowerPoint don’t always get along when it comes to polling (although we’re constantly working to balance that for you). If moving from Mac to PC causes problems with your polls, you might want to create on a PC instead. And please let our customer support team know if you do run into problems with Mac-PC pairings. It helps us keep things smooth.
The backup plan: If you run into any PowerPoint issues in class, remember you can always open My Polls on the web and use the left-right arrows on the chart to navigate through your activities in full-screen.
How to conduct an attendance poll
(Paid features: Grading & Registration) The main ingredients of a good attendance poll are cunning and speed. After students learn your PollEv.com username, they can follow along with your active polls from anywhere. That means you’ll have to be a little sneaky to accurately gauge who’s actually in class and who’s lying in bed.
Most professors structure an attendance poll like this:
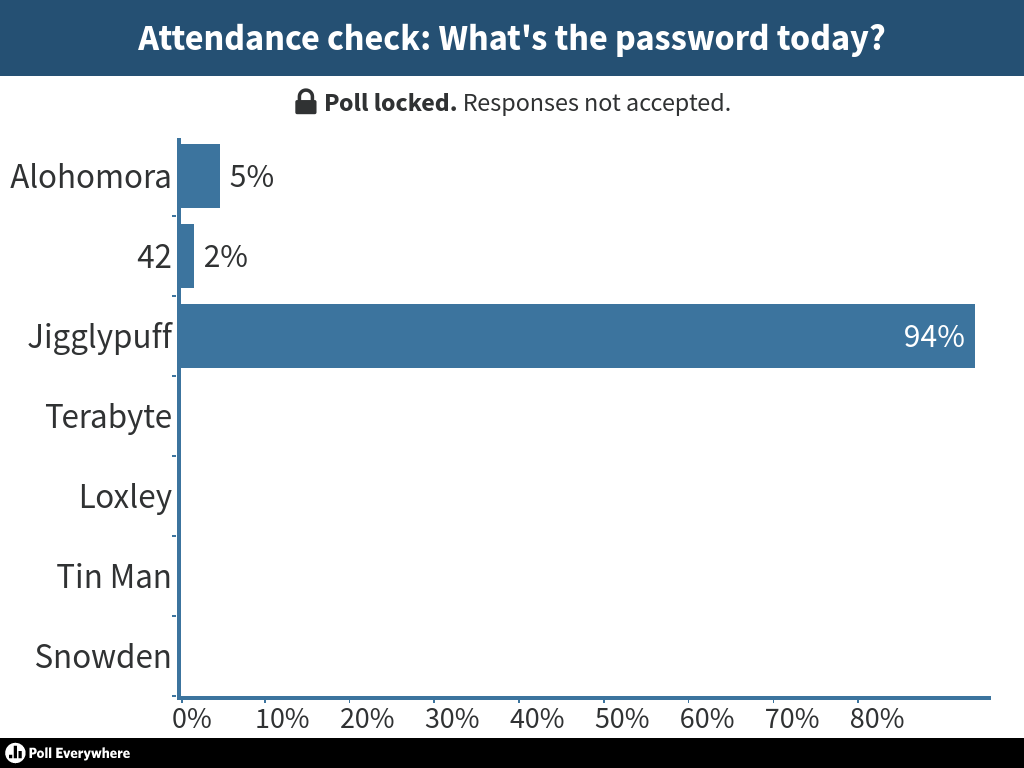
- Present a question that requires extra input (like, “What is the password?”)
- Reveal the answer, either out loud (most effective), or written on a whiteboard (works okay, but allows more time to text an absent friend the answer)
- Allow 10-20 seconds for a multiple-choice response (use 5+ response options for better accuracy)
- Lock poll (or let the auto-lock timer do it for you)
Settings: Designate the correct response for easy attendance-at-a-glance later. Make sure the poll allows registered participants only. Give students notice that they should log into Poll Everywhere as they are seated, to be ready for the attendance question.
Add a multi-question assessment or homework
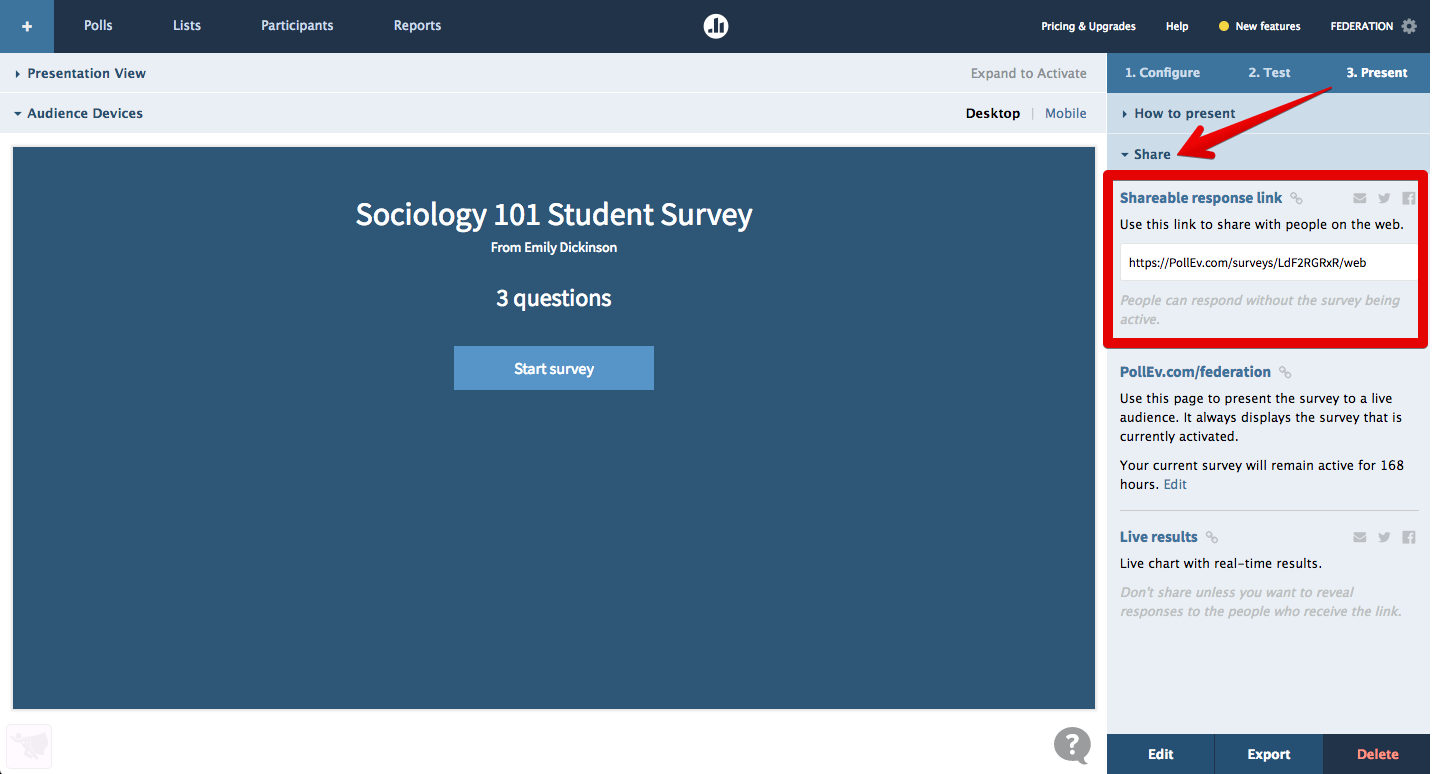
(Free) Create a Survey to use multi-question activities inside or outside of class. Surveys are especially useful when you want to continue to use live, in-class activities while keeping an ‘anytime’ activity open in the background. Some instructors like to begin the semester with a “Getting to Know You” survey, so they can have a better view of students’ motivations, goals, and background. (Don’t forget to require registration, so you can identify students by name.)
Each survey comes with a response link that can be used at any time, regardless of which poll or activity is currently in use. Use this sharable response link to allow students to respond on their own time. Or you can present a survey live by activating it. That will make it appear on your pollev.com response page.
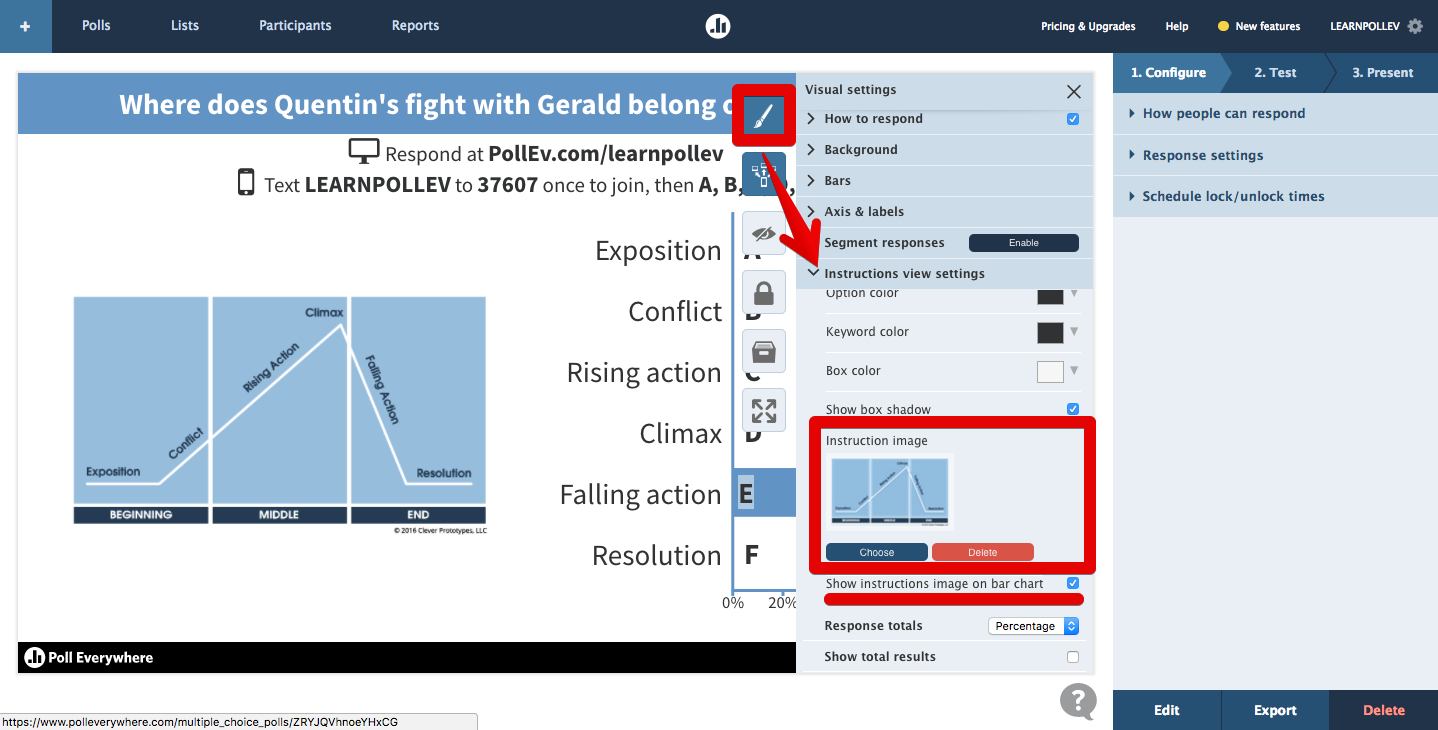
Illustrate a multiple choice question
(Free) You can add an instructional image to any multiple choice question. The image will appear on the big screen alongside the response options. It will also display on students’ devices, so they can refer to it while answering the question.
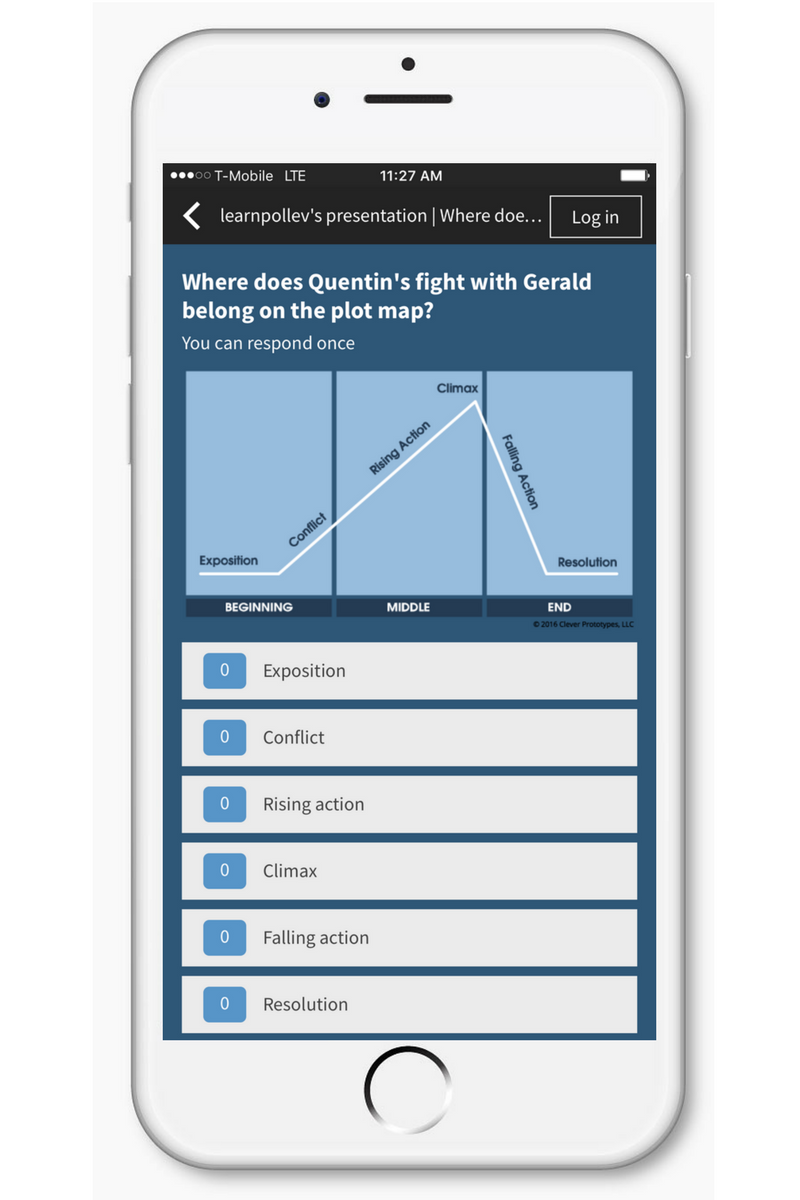
To add an instructional image, select the paintbrush icon on the chart. Choose Instructional image, and upload the image you want to use. Use the checkbox below it to choose whether to display the image alongside the response chart. If you do not check this box, it will only display the image while responses are hidden. (The eye icon shows or hides responses.) Regardless of what you choose to show on the big screen, the image will always display on student devices.
LMS integration can speed up busy work
(Paid features: LMS integration, Registration, Grading) If your institution has a qualifying plan, you may already have LMS integration capabilities for Canvas, Blackboard, or Moodle. If not, approach your administrator to see if it would be worth purchasing an integration for your department or school. The LMS integration enables you to import student registration lists, automatically create free participant accounts for each student, and export grades and participation scores at the end of the semester. Learn how to use your LMS connection in the instructor guide. Contact Sales for a new LMS connection.
Find inspiration for the new semester
(Free) These are activities that don’t require paid features like grading or registration. Use them to inspire honest discussion, collect questions, check for understanding, or kick off a debate.
- Discuss tough topics with anonymity + open response questions
- Make sure students are keeping up with the pace of instruction
- Let students make decisions and discover the consequences
- Map student opinions on a spectrum
- Assign surveys for quizzes or homework
- Explore political topics in a safe environment
- Collect and rank student questions in 60 seconds
Become a PollEv expert in your pajamas
(Free) Most questions about PowerPoint integration, registration, etc. can be answered by watching a quick video. But if you’d rather learn from a real, live person, you can always sign up for the weekly webinar.
Need a free educator account?
If your classes are smaller than 40 students each, and you don’t require features like grading or reporting, you can probably do very well on the free educator account. Many educators use the free account to encourage open discussion, collect questions, and to check that students understand what’s being presented, all while there’s still time to adjust instruction. Keep the free account until you decide you need more. Then upgrade to a premium plan.